How To Operate A Wood Lathe?
I. Holds Operational Qualification of Wood Turning Lathe
For wood lathes tools assigned to a specific, dedicated operator, the operator must pass a qualifying examination and hold a valid "Equipment Operation Certificate" for that specific machine before operating it. For wood lathe turning machine tools not assigned to a specific operator, any individual intending to use the wood lathing must likewise hold a valid "Equipment Operation Certificate" for that machine before doing so.
II. Strictly adhere to the following general regulations for how to use a wood lathe
(I) Prior to commencing work, ensure the following:
#1. For machines assigned to a specific operator, the operator shall carefully review the shift handover log to understand the machine's operational status and any existing issues from the previous shift.
#2. Inspect the lathe wood machine and the surrounding work area; remove any debris or objects unrelated to the work at hand.
#3. Verify that all safety guards and protective devices are present and in good working order. Operation of any powermatic wood lathe machine lacking proper safety guards is strictly prohibited.
(1). Verify that the operating controls are positioned in the "non-working" (neutral or off) position.
(2). Verify that the electrical control cabinet is securely closed and that the electrical grounding is intact.
(3). Verify that the oil levels in all lubrication reservoirs are sufficient and that the seals are intact. Ensure that all oil gauges, oil cups, oil nozzles, and similar components are present, correctly installed, and free of blockages. Replenish lubricants in accordance with the prescribed lubrication chart.
#4. For wood lathe tool machines that have been idle for one full shift or longer, perform a "dry run" (idle test) to confirm that the machine is operating normally before commencing actual work.
#1. For wooden lathe assigned to a specific operator, the operator must remain at their post, operate the machine diligently, and refrain from engaging in activities unrelated to the work. When leaving the wooden wood lathes, the operator must stop the machine and cut off the power supply. For wood lathe tools not assigned to a specific operator, the user must stop the wood for lathe turning machine and cut off the power supply immediately upon finishing their work.
#2. Cutting tools and workpieces (wood) must be clamped correctly and secured firmly.
#3. Any mechanical speed adjustments to the transmission or feed mechanisms must be performed only after the cutting tool has disengaged from the workpiece and the machine has been stopped.
#4. Ensure that the wood contains no embedded nails or metal objects; take strict precautions to prevent damage to the wooden lathe tools.
(1). Closely monitor the machine tool's operational status, lubrication, temperature rise, and sound levels. If any abnormal conditions are detected, immediately stop the machine to inspect it; resume work only after the fault has been resolved.
(2). In the event of an accident involving the machine tool, immediately stop the lathe for wood turning machine, preserve the accident scene, and report the incident to the relevant departments for analysis and resolution.
#1. Return the control handle to the non-operating position and cut off the power supply.
#2. Wipe down the tools wood lathe and clean the work area.
#3. For turning wood lathe assigned to a specific operator, the operator must record any issues with the wood lathe machine discovered during the shift in the shift handover logbook and properly complete the shift handover process.
III. Strictly adhere to the following specific regulations regarding wooden lathe
Cutting tools must be mounted on an adjustable tool rest or held manually while resting firmly against the tool rest during turning operations; holding the tool freehand (suspended in mid-air) is strictly prohibited.
#1. During operation, wait until the spindle is running smoothly before feeding the workpiece for milling. When using large-diameter milling cutters, operate the machine at a reduced speed.
#2. The raising and lowering of the spindle should not be performed too rapidly, nor should the cutting depth be set too deep; manual feeding of the workpiece must be performed uniformly.
#3. If spindle reversal is required, wait until the cutter has fully retracted from the workpiece and the spindle rotation has completely ceased before engaging the reverse direction.
#4. For the Model ФM Woodworking Milling Machine, cutter heads are permitted for use only at a spindle speed of 1320 rpm. Cutter heads are strictly prohibited for milling operations at the other three available speeds: 2010 rpm, 2645 rpm, and 4080 rpm.
#5. Feeding Speed: 18,000 rpm. Scope of Application: Production of panel furniture, decorative elements, plastic sheet products, etc.
#1. Before commencing work, manually rotate the cutterhead to verify that it spins freely and smoothly; only then may the machine be switched on.
#2. Planing operations may only begin after the machine has been switched on and is running smoothly.
#3. Jointer/Surface Planer: (1) Adjust the position of the safety guard according to the width of the workpiece being planed.
(2) When planing, carefully inspect the wood for knots to distinguish between "dead" (loose) knots and "live" (tight) knots, to prevent loose knots from being dislodged and causing injury.
#4. Thickness Planer: When planing, pay attention to the taper of the workpiece (e.g., thicker at one end and thinner at the other). Adjust the cutting depth appropriately based on the size of the workpiece; the maximum cutting depth must not exceed 5 mm.
#1. Circular Saws:
(1) Before commencing work, verify that the circular saw blade is installed correctly and securely fastened. Manually rotate the blade to ensure it spins freely and smoothly.
(2) When sawing, do not apply excessive feed pressure. If the blade speed slows down due to excessive feeding, immediately retract the workpiece slightly until the blade speed recovers, then resume feeding.
#2. Standard Bandsaws:
(1) Before commencing work, adjust the bandsaw blade tension to an appropriate level, ensuring that the tips of the saw teeth protrude slightly beyond the edge of the flywheel rim. (2) When adjusting the tilt of the worktable as needed, take care to avoid contact with the saw blade or the guide blocks; upon completion of work, promptly return the worktable to a level position.
(3) When sawing material, the feed rate must not be excessive; if an excessive feed rate causes the saw blade's rotational speed to slow down, immediately retract the timber slightly until the speed recovers, then resume feeding.
(4) After work, lower the upper flywheel to release tension on the saw blade.
#3. 48" Carriage Bandsaw:
(1) Pre-operation procedures:
① Adjust the saw blade to ensure appropriate tension; the tips of the saw teeth should protrude 20 mm beyond the rim face of the flywheel.
② Ensure the upper and lower guide blocks (fitted with hardwood inserts) clamp the saw blade securely to prevent lateral oscillation, but do not clamp them so tightly as to cause the blade to overheat.
③ Ensure the wooden safety guard door covering the upper flywheel is securely closed.
(2) Operational procedures:
① When sawing material, disengage the clutch that controls the carriage movement to allow for immediate adjustment as needed.
② Frequently apply kerosene or water to the saw blade to provide lubrication and cooling.
③ Position the upper guide block slider so that the guide block sits 50–100 mm above the timber being sawn.
④ Determine the appropriate speed of the carriage based on the volume and the hardness/texture of the timber being sawn.
⑤ When sawing round logs into square timber, engaging only the upper dog (clamp) is sufficient; however, when sawing thin boards from round logs, both the upper and lower dogs must be engaged simultaneously.
⑥ After the outer bark or a board has been sawn off, when the carriage retracts, take precautions to prevent the timber-which may have shifted or warped-from striking the saw blade.
⑦ If a malfunction occurs midway through sawing and the carriage needs to be retracted, firmly hold the control lever mounted on the carriage frame to lock the timber carriage in place and prevent it from shifting.
⑧ Never perform tasks such as adding lubricant or tightening bolts while the machine is in motion.
⑨ When the machine is taken out of service or when loading timber onto the carriage, ensure the carriage control lever is securely locked in the neutral position.
(3) After work, lower the upper flywheel to release tension on the saw blade.
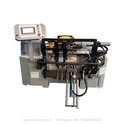
Suitable for processing various stair columns, Roman columns, wooden vases, wooden column tables, sticks, wooden furniture, children's bed posts, table and chair legs, basebal bats and other cylinderical woodwork pieces. etc.


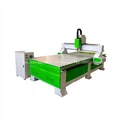
Mainly on manufacturing of furniture, such as chairs, tables, cabinets, and shelves. Moreover, they are used to create intricate and beautiful designs that would be difficult to achieve using traditional methods.


Specially designed for engraving complex 3d/2d stone, such as jade, amber, agate, yellow dragon jade, pebbles and other soft jadeite, as well as granite engraving, marble carving and other artistic crafts for carving.


User Evaluation

Enrique
Mexico
Spiros
Greece
Ivaylo
Bulgaria